
Basic wound management
Author Credentials
Author: Suzana Tsao, DO, University of Pennsylvania.
Update Editor: Pollianne Ward Bianchi, MD; Drexel University College of Medicine
Section Editor: William Alley, MD; Wake Forest School of Medicine
Update: 2023
Case Study
A 35-year-old man presents to the Emergency Department with a wound to his left hand. He states he fell and cut his hand on a metal object on the ground. He denies any head, neck, or back trauma. He is right-handed. He has no medical problems, denies prior surgeries, and is not currently taking medication. He has no known drug allergies. On examination the wound is contaminated with gravel and has no active bleeding (Figure 1). He has a normal neurologic exam. No other injuries were identified on exam.
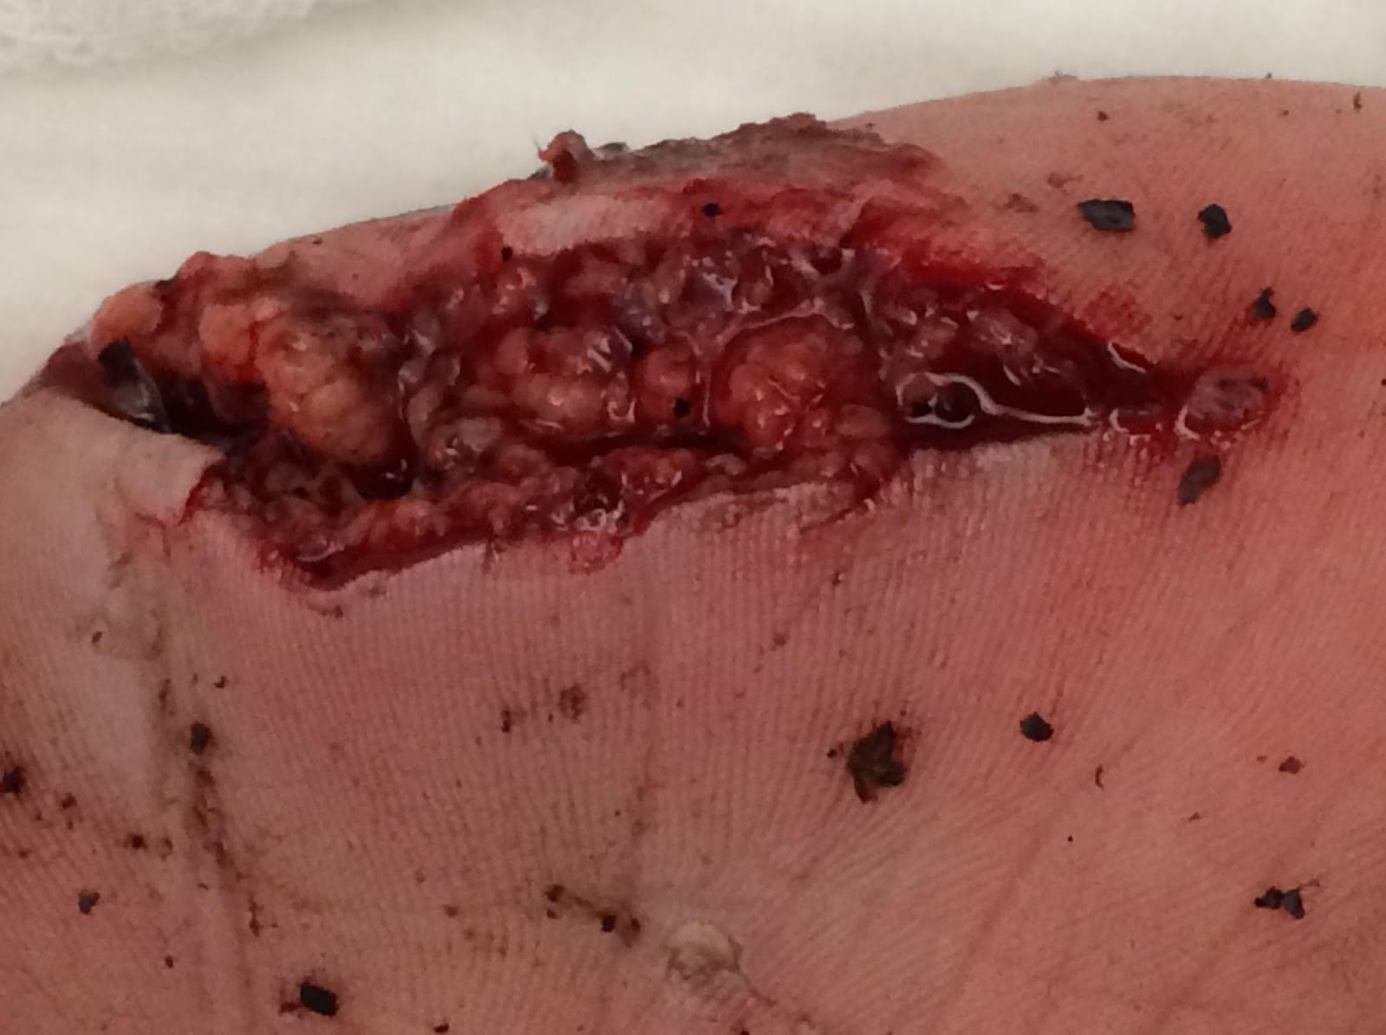
Figure 1. Dirty hand wound. Image courtesy of Suzana Tsao, DO, used with permission.
Objectives
By the end of this module, the student will be able to:
Describe the key points in evaluating a wound.
List indications and contraindications for immediate, delayed, and non-closure approaches
Describe how to irrigate a wound appropriately.
Describe how to anesthetize a wound.
For the various types of laceration repair (steri-strips, tissue adhesive, staples, sutures), list:
Indications
Contraindications
Technique
Describe the size of the suture used for various parts of the body.
Describe the timing of suture removal for various body parts.
Recognize special considerations in wound management (need for antibiotics, when to consult specialist)
Introduction
Open wounds account for approximately 4.5% of ED visits annually. Patients seeking Emergency Department treatment for wounds are generally concerned about cosmesis, infection control, and pain management. Each of these issues needs to be addressed. It is important that ED providers choose the appropriate method of wound closure, considering the type of wound, the location, and the risk of infection.
Initial Actions and Primary Survey
A primary survey of the ABCs should be obtained in any patient presenting to the Emergency Department with a traumatic injury. It is important to examine the location and depth of the wounds and their effects on the airway and breathing. For example, a wound over the neck could have a direct injury to the airway or be an expanding hematoma that could impinge on the airway. In addition to the basic evaluation for circulation, the wound should be inspected for signs of arterial bleeding and exsanguination, and methods for hemostasis should be employed.
Presentation
Patients seeking care in the Emergency Department for a wound or laceration can have a variety of presentations depending on the mechanism of injury and the presence of associated injuries. A thorough history and physical exam will help to identify associated injuries, risk factors for infection, the timing of the wound closure (e.g., primary, secondary, or delayed primary closure), the type of closure (e.g., tape, wound adhesives, staples, or sutures), and the need for consultation (e.g., associated neurovascular injury, underlying fracture, high-pressure injuries).
Key historical components include:
Mechanism of injury
Location (both anatomical and environmental)
Time of injury
Medical history/comorbid conditions (e.g., immunocompromise, diabetes, history of keloid formation)
Tetanus immunization status
Associated symptoms (e.g., bleeding, numbness, weakness)
Key physical exam components:
Location and damage to underlying structures
Presence of devitalized tissue
Contamination and/or the presence of foreign bodies
Complete neurovascular exam
Diagnostic Testing
Diagnostic testing should be guided by the history and physical exam findings. X-rays should be obtained to evaluate for underlying fractures and/or retained foreign bodies. Ultrasound can also be utilized to look for radiolucent foreign bodies. Advanced imaging, such as CT scans, should be obtained if there is a question regarding an underlying fracture and/or there is a high suspicion of associated injuries.
Treatment
Wound Closure Videos
Below are videos created by Dr. Michelle Lin in her Video Instruction of Procedures in the ER (VIPER) series from Academic Life in EM.
Chapter 1: Equipment (1:54 min)
Chapter 2: Anesthesia(3:09 min)
Chapter 3: Irrigation (1:11 min)
Chapter 4: Starting the Procedure(2:30 min)
Chapter 5: Simple Interrupted (3:45 min)
Chapter 6: Horizontal Mattress (3:11 min)
Chapter 7: Vertical Mattress (1:10 min)
Chapter 8: Corner Suture (1:30 min)
Chapter 9: Buried Suture (1:51 min)
Chapter 10: Dermabond (1:56 min)
Chapter 11: Steristrips (0:39 min)
Chapter 12: Staples(0:47 min)
Indications
Approaches to wound closure can be grouped into three categories: primary closure, delayed primary closure, and healing by secondary intention.
Primary Closure: The wound is closed in the acute phase, on the initial presentation to the provider. History and physical should indicate these wounds have a low risk for infection, retained foreign body, neurovascular compromise, or damage to critical underlying structures.
Delayed Primary Closure: The wound is irrigated, cleaned, debrided, and bandaged. Repair is scheduled for a later date (approximately 4-6 days). This method is often chosen in wounds at high risk of infection. It provides faster and more cosmetically pleasing outcomes than healing by secondary intention.
Secondary Intention: The wound is allowed to heal spontaneously. Often reserved for dehisced surgical wounds or wounds presenting very late after the injury occurs. Healing is slower and often leads to significant scarring.
This Discussion will concentrate on the various types of primary closure.
Wound Irrigation/Preparation
All wounds must be irrigated before closure to decrease bacterial contamination and remove debris. Traditionally, sterile saline or sterile water has been used to irrigate wounds. Recent studies, however, indicate that wounds irrigated with tap water have a similar rate of infection when compared to sterile solutions: volume of irrigant is the key factor in decreasing decontamination. Wounds should not be soaked in water or other solutions, as this does not reduce the risk of infection (and may, in fact, increase the risk of infection). A minimum of 250cc of fluid should be used to irrigate the wound or until there is no more visible debris. In general, the more contaminated the wound, the larger the amount of solution that should be used. It is also important to note that Betadine and Hydrogen Peroxide have not been shown to be helpful in irrigation.
Materials for Irritation
19 gauge angiocath or irrigation shield
20-35cc syringe
sterile saline, sterile water, or tap water (at least 250cc)
gloves
face shield
chlorhexidine gluconate or povidone/betadine swabs
Method for Irrigation
Draw the water up into the syringe and spray it into the wound using the 19 gauge angiocath or irrigation shield.
Once the wound is sufficiently cleaned, wipe the surrounding skin with chlorhexidine gluconate or povidone/betadine swabs. Take care not to get these solutions in the wound, as they impair wound healing.
Note: you often need to anesthetize the wound first to facilitate thorough cleaning.
Anesthesia
Local anesthesia is typically used before placing sutures. It may also be necessary to anesthetize a wound to facilitate thorough irrigation. Documenting a complete neurologic exam of the area before anesthesia is important. The most common local anesthetics used in the ED are lidocaine, lidocaine with epinephrine, and bupivacaine. In children, topical anesthetics like LET (lidocaine, epinephrine and tetracaine) can be helpful in avoiding pain and the fear of needles.
Materials for Anesthesia
- Anesthetic
- 18 gauge needle
- 27 gauge needle
- 10 cc syringe
Method for Anesthesia
Draw up the desired amount of anesthetic with the 18 gauge needle and syringe.
Recap the needle and remove it from the syringe.
Place the 27 gauge needle on the syringe and remove air from the syringe.
Insert the needle through the open wound margin (do not insert through intact skin).
Advance the needle along the length of the wound.
Aspirate to avoid inadvertent injection of the anesthetic into the vasculature.
Inject the anesthetic as you withdraw the syringe from the wound.
Repeat this process until the entire margin of the wound is anesthetized.
Use of Different Laceration Repair Agents Adhesive tapes or steristrips
Indications
Low tension
Linear
Superficial
Areas where the skin is thin and may not hold sutures (e.g., skin tears in the elderly)
Contraindications
High tension wounds (e.g., over joints, gaping wounds)
Wounds that require layered closure
Wounds in high moisture areas (e.g., axilla/groin)
Technique
The wound should be cleaned and prepped as described above.
Thoroughly dry the wound.
Apply tincture of benzoin (or medical adhesive) to the skin where the tape is to be applied to increase adhesion of the tape to the wound.
Cut the adhesive tape to the desired length. Leave approximately 2-3 cm on each side of the wound.
Remove one strip from the backing and apply to one side of the wound.
Gently oppose the two margins of the wound and place the second ½ of the strip over the wound while pressing down on the tape.
You may apply extra tape approximately 2-3cm parallel to the wound over the initial tape to secure it.
You can find a good video demonstrating this procedure on the Laceration Repair website.
Tissue Adhesive (glues)
Indications
Low tension
Linear
Superficial
<4cm length
Contraindications
High tension wounds (e.g., over joints, gaping wounds)
Wounds that require layered closure
Technique
The wound should be cleaned and prepped as described above.
Thoroughly dry the wound and control bleeding.
Using fingers or gauze, approximate the wound margins.
Squeeze the adhesive tube so that a small amount of adhesive appears on the applicator tip.
Apply a thin layer to the wound.
Apply 3 to 4 more layers allowing the adhesive to dry between applications.
Continue to approximate the wound for 1 minute after the final application.
Steristrips or adhesive tapes can be used with adhesive glues to provide extra strength.
Note: Do not apply antibiotic ointment to the tissue adhesive, as this will dissolve it. If you need to remove the adhesive, use petroleum-based ointment or acetone.
You can find a good video demonstrating this procedure on the Laceration Repair website.
Staples
Indications
Scalp lacerations
Linear laceration on trunk or extremities where cosmesis is not a priority
Contraindications
Gaping wounds requiring layered closure
Wounds in areas where cosmesis is a high priority (e.g., face)
Technique
The wound should be cleaned and prepped as described above.
Consider the use of local anesthesia. (sometimes, a single staple hurts less than a lidocaine injection)
Evert the wound margins (may need the help of an assistant) with forceps or fingers.
Target the first staple toward the center of the wound, bisecting the wound.
Place the arrow on the staple gun in the midline of the wound.
Squeeze the handle to insert the first staple.
Continue in this fashion, bisecting the remaining parts of the wound.
You can find a good video demonstrating this procedure on the Laceration Repair website.
Sutures
Note: For the purpose of this module, we will only discuss simple interrupted sutures. More advanced suturing, such as layered closure, mattress sutures, and complex wounds, can be seen in the video links.
Indications
Clean wounds with little perceived risk of infection
Wounds in areas where cosmesis is paramount (e.g., face)
Wounds over tendons or nerves that need closure for protection
Contraindications
Heavily contaminated wounds
Wound with a high risk of infection (e.g., puncture wounds, fight bite)
Non-cosmetic animal bites
Wounds with a high risk of tissue destruction (high-pressure wounds)
Technique
The wound should be cleaned, prepped, and anesthetized as described above.
Load the needle onto the needle driver at the proximal 1/3 of the needle.
Target the first suture in the center of the wound, bisecting the wound.
With the needle perpendicular to the skin, pierce the skin and bring it through the center of the wound using an arc-like movement of the wrist.
Once most of the needle is visible in the center of the wound, unload the needle driver and pick up the needle from the center of the wound (with forceps or the needle driver) and pull it through. Leave approximately one inch(2.5cm) of suture material as a tail.
Reload your needle as described above using forceps or hemostats to avoid puncturing yourself with the needle.
Bring your needle through the inside of the wound and out the intact skin on the opposite side. Pull the suture material through, being careful not to pull your entire suture out of the wound.
Unload the needle driver and place the needle driver on the inside aspect of the suture parallel to the wound. Wrap the long tail of the suture around the hemostat twice.
Grab the short tail of the suture with the needle driver on the other side of the wound and pull it through. Always wrap the suture around the needle driver towards, not away from the wound.
Repeat, this time wrapping the suture only once around the needle driver.
Repeat this entire process for additional 3-4 throws (i.e., tying knots
Cut the suture leaving a 1-2cm tail to facilitate suture removal.
Continue in this fashion, bisecting the remaining parts of the wound until the tissue approximation is satisfactory.
Note: After a couple of sutures are placed, you may no longer be able to bring the needle through the center of the wound. In that case you should bring the needle out through the skin on the other side of the wound.
You can find a good video demonstrating this procedure on the Laceration Repair website.
Suture choice and duration
In general, suture choice is dictated by the cosmetic considerations and wound tension. For lacerations involving the face or other areas where the cosmetic result is most important, thinner sutures with smaller needles should be used. On the other hand, lacerations over joints or gaping wounds require lower gauge sutures for strength (Table 1).
Suture Size By Location | |
Location | Suture Size |
Face | 5-0 to 6-0 |
Scalp | 4-0 to 5-0 |
Trunk | 4-0 |
Extremities | 3-0 to 4-0 |
Oral | 4-0 to 5-0 |
Table 1. Suture size by location.
Similarly, wounds under higher tension require longer to heel. Whereas sutures on the face or scalp can be removed in about five days, wounds on the trunk or extremities should remain longer (Table 2).
Time to Suture Removal by Location | |
Location | Days to Removal |
Face | 5 days |
Scalp | 5 days |
Trunk | 7-10 days |
Extremities | 7-10 days |
Table 2. Time to suture removal by location.
Are antibiotics indicated?
The vast majority of wounds repaired in the ED do not require antibiotics, but can be considered under special circumstances. Antibiotic selection should be directed toward the specific infectious agents you are worried about.
Some examples include:
- Wounds associated with animal or human bites are often contaminated (Pasturella spp and Eikenella corrodens). Consider Amoxicillin/clavulanate.
- Wounds grossly contaminated by dirty water or seawater (ex: oyster cuts). Consider coverage against noncholera vibrio spp (doxycycline) and Aeromonas (Trimethoprim/sulfamethoxazole, amoxicillin/clavulanate and newer fluoroquinolones)
- Wounds with obvious evidence of cellulitis. Cover Staphylococcus and Streptococcus (Trimethoprim/sulfamethoxazole, cephalexin, dicloxicillin, clindamycin) based on local resistance patterns.
Does this wound repair require specialist consultation?
Certain wounds (or wound patterns) should prompt you to consider specialist consultations.
Some examples include:
Wounds with special cosmetic considerations, such as larger wounds to the face in children (plastic surgery or ENT)
Wounds that breach the border of the eyelid (ophthalmology)
Wounds with underlying bone, tendon, or joint involvement (orthopedics)
Wounds to genitals may require specialized urologic or gynecologic repair. These may also be markers of abuse, necessitating a child protection team or other social service evaluation.
Pearls/Pitfalls
Assess for associated injuries
Bone, vascular, and nerve
Assess for foreign body
Always check tetanus immunization status and update if needed
CDC guidelines: http://www.cdc.gov/vaccines/pubs/pinkbook/tetanus.html#wound
Consider antibiotics vs. delayed primary closure for high-risk wound and/or co-morbid conditions
Don’t dismiss high-pressure injuries
Case Study Resolution
The patient’s wound was anesthetized and thoroughly irrigated. Given the degree of contamination, the provider decided to loosely close with 4-0 nonabsorbable sutures and advised to return to the ED in 2 days for a wound check to assess for signs of infection. The patient was started on a 5-day course of antibiotics for wound infection prophylaxis.
References:
Centers for Disease Control and Prevention. National Center for Health Statistics. Health Data Interactive. www.cdc.gov/nchs/hdi.htm. [October 2014].
Garcia-Gubern CF, Colon-Rolon L, Bond MC. Essential Concepts of Wound Management. Emerg Med Clin N Am. 2010; 28: 951-967
Lammers RL, Smith ZE. “Methods of Wound Closure.” Robert and Hedges’ Clinical Procedures in Emergency Medicine.Ed 6. James R. Roberts. Saunders, 2013. 644-690.
Lammers RL, Smith ZE. “Principles of Wound Managment.” Robert and Hedges’ Clinical Procedures in Emergency Medicine. Ed 6. James R. Roberts. Saunders, 2013. 611-643.
Lloyd JD, Marque III MJ, Kacprowicz RF. Closure Techniques. Emerg Med Clin N Am. 2007; 25: 73-81.
http://lacerationrepair.com
http://www.aliem.com/videos/